
How to Use the NYC Subway: A Step-by-Step Guide With Area Maps
by: Max Vishnev, founder of CityRover Walks NY and licensed NYC tour guide
Are you intimidated by the thought of getting around NYC using the subway? Fear not! We’ve got your covered.
Using this detailed subway guide for beginners you will learn how to use the NYC subway like a local!
Read on to learn how to buy a MetroCard or use the new OMNY payment system, how to navigate New York’s massive subway system without getting lost, what the different subway fare options are, and how to get subway directions. We also include detailed area maps with subway stations highlighted for added convenience!
So let’s jump right in with some subway FAQs to answer your most pressing questions and quell some of your fears:
Table of Contents
Subway FAQs
Generally, yes. The subway is the cheapest and most efficient way to get around New York City IF you know what you are doing. It usually gets you from one part of the city to another faster than taking a taxi or uber. That’s because, to state the obvious, the subway is not subject to NYC traffic lights and congestion. So, unlike sitting in a taxi in stop-and-go traffic or rush-hour gridlock, just watching the meter tick up, you can ride the subway completely oblivious to what’s going on above ground (though the subway does go above ground outside of the center of Manhattan).
The NYC subway never stops running! It runs 24 hours, 7 days a week, which can’t be said for the Paris Metro or London’s Tube. That means you can get back to your hotel after a night of bar-hopping without having to wait 30 minutes in a taxi line only to be rejected by a Parisian taxi driver when your turn comes, because he doesn’t feel like taking you to your hotel (yes, Pierre, I am still bitter after all these years!).
That said, the trains run a lot less regularly at night, so expect a longer wait time at 2am compared to 2pm. Also, even though the subway system as a whole never shuts down (with very rare exceptions for severe winter storms), some lines get shut down periodically in sections for maintenance and repair work. The MTA posts planned work using station posters, as well as on their website.
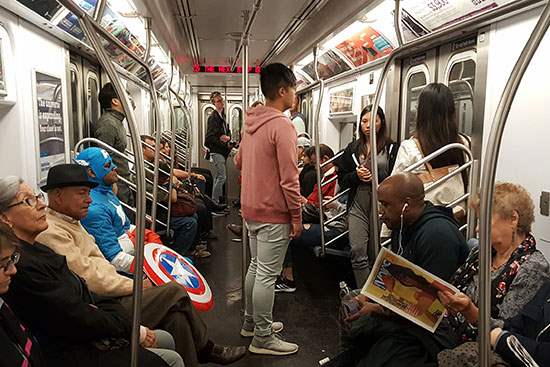
The short answer is yes. The subway system (just like city parks) reflects the overall safety of the city. Violent crime in the city peaked in the early 1990s and has been on a downward trend since. Like other large cities, there was an uptick in crime during Covid, and there was a couple of high-profile incidents of violence on the subway, but the subway remains safe. It is the most common way for New Yorkers to travel, and each day has several million passengers. There will often be as many people on the subway (in Manhattan) at midnight as there will be at noon – maybe more. You might even spot the occasional superhero (see Captain America relaxing on the subway when you scroll down):
The longer answer is that you still need to be vigilant, use common sense, and exercise caution.
The subway platforms and cars can get pretty crowded, especially during the morning and evening rush, so don’t stay near the platform edge, don’t put your phone and wallet in your back pocket (where a pickpocket can get to it easily on a crowded subway car), don’t stare at anyone (as hard as that may be, sometimes), and certainly don’t get involved in any arguments (if there is a crazy or disruptive passenger on the same subway car as you, just switch to another car at the next stop).
Yes. There are kids of all ages riding the NYC subway on any given day. In fact, for most of us in New York City who have children the subway is the most practical way to get around — whether that’s dropping our kid off with a grandparent or at school or taking them to the doctor. You’ll see New Yorkers (and tourists) with newborns in baby carriers, toddlers in strollers, and older kids taking the subway home from school in the afternoon — by themselves — gasp!
A lot of New Yorkers find reasons to complain about the subway fairly regularly. And we are no exception. It’s not fun when you’re already running late and the train you are on is stuck in the station (or worse, between stations) because of a signal malfunction, a sick passenger on the train ahead, or just unforeseen train traffic (yes, “subway traffic” is also a “thing”).
But oftentimes, we take for granted the fact that we have an enormous, 24/7 transit system that carries up to 6 million riders a day, most of whom are getting in and out of the tiny island of Manhattan, which is only 2 miles wide (at its widest) and is always crammed with people, cars, and buildings. So the fact that we have 472 stations and 22 lines (and 3 shuttles) and that most of us can afford the fare and that on MOST days, it does get us to work and home on time, is something we should appreciate, despite the occasional “commute from hell” (which can also happen in a car, on a bus, or on a plane).
The Subway is generally the best way to get around New York City if you’re traveling more than a mile (otherwise, just walk, you’ll live longer!). This is especially true if you’re going from one part of the city to another. For example, from Downtown to Midtown Manhattan, or from Brooklyn Heights to the Museum of Natural History.
The best time is usually “off peak” hours Monday through Friday. That means after the morning rush and before the evening rush. But with over 4 million “swipes” each weekday, the term “rush hour” is stretched over 2 to 3 hours. Morning “rush” is usually from 7am to 10am, while evening rush begins before 5pm and can last until 8pm.
During these times, the subway cars can get pretty crowded and the commute can become somewhat stressful. On the most crowded lines, it is not uncommon for a subway car to be so packed with commuters that you might be bumping into people to your left and right, with a backpack in your face and a stranger breathing down your neck with morning coffee breath — that is if you can squeeze in at all.
So unless you are an experienced strap-hanger, love crowds, or have a timed ticket somewhere, avoid the busiest times – especially if you are a NYC subway rookie.
Our subway fare is one flat rate — $2.90 per ride (if you buy a Metrocard with at least two rides’ worth or pay with your phone through the OMNY system, otherwise it’s $3 .25for a Single Ride Metrocard). If you use OMNY or get a weekly or monthly “unlimited” option, the price per ride can be lower (we will discuss these options later in this guide).
The concept of fares by zone, so common in cities with large metro systems, does not apply. There has also never been an “exit” fare. What this means is that it doesn’t matter whether you are traveling 3 stops or all the way to the end of the line – you’re paying the same rate to ride. It also means that you don’t have to dig out the Metrocard from your pocket or tap your phone on your way out.
No. Let’s not sugarcoat it. The NYC subway system is very big, often crowded, experiences occasional delays (or frequent delays, if you listen to grumpy New Yorkers late for work), and could be very confusing for first-time visitors, especially for those who don’t have much experience with large metro systems. With more than 22 subway lines (plus 3 shuttles), over 700 miles of tracks, and 472 subway stations, it’s easy to get intimidated, lost, or both.
This is why we wrote this guide. It is designed to give you some basic knowledge and confidence in using the system correctly and to lower your stress level as you plan your first trip to NYC.
Old. Very old. Our subway may not be as old as London’s Tube, but it has lots of white hairs (or white tiles?). The first official subway line, opened in 1904 and ran from City Hall Downtown to Grand Central Depot on 42nd Street. Then, it made a turn westward to an area that had just been dubbed “Times Square”, in honor of the New York Times, which had just moved up to 42nd Street and built the Times Tower at the intersection of Broadway and 7th Avenue. From Times Square, the subway ran north up to Harlem.
The first subway was called Interborough Rapid Transit, or IRT for short. Later, we introduced BMT (“Brooklyn-Manhattan Transit”) and IND (“Independent”). All three systems were eventually consolidated under the MTA banner. So if you think the subway sounds confusing now, imagine what tourists must have felt like when trying to figure out three different systems?!
By the way, here is a fun piece of subway trivia for your next trivia night:
The original subway fare in 1904 was a nickel. And it remained a nickel for 44 years, after which time it went up to a dime!
But if even after reading the Subway FAQs above you still don’t think you can navigate the NYC subway system on your own or you want to local guide show you the real New York, contact us about a custom private tour during your visit to New York City, which would include one or more subway rides (and an orientation). We also specialize in one-day NYC Highlights private tours to help you get the most out of a short visit to NYC.
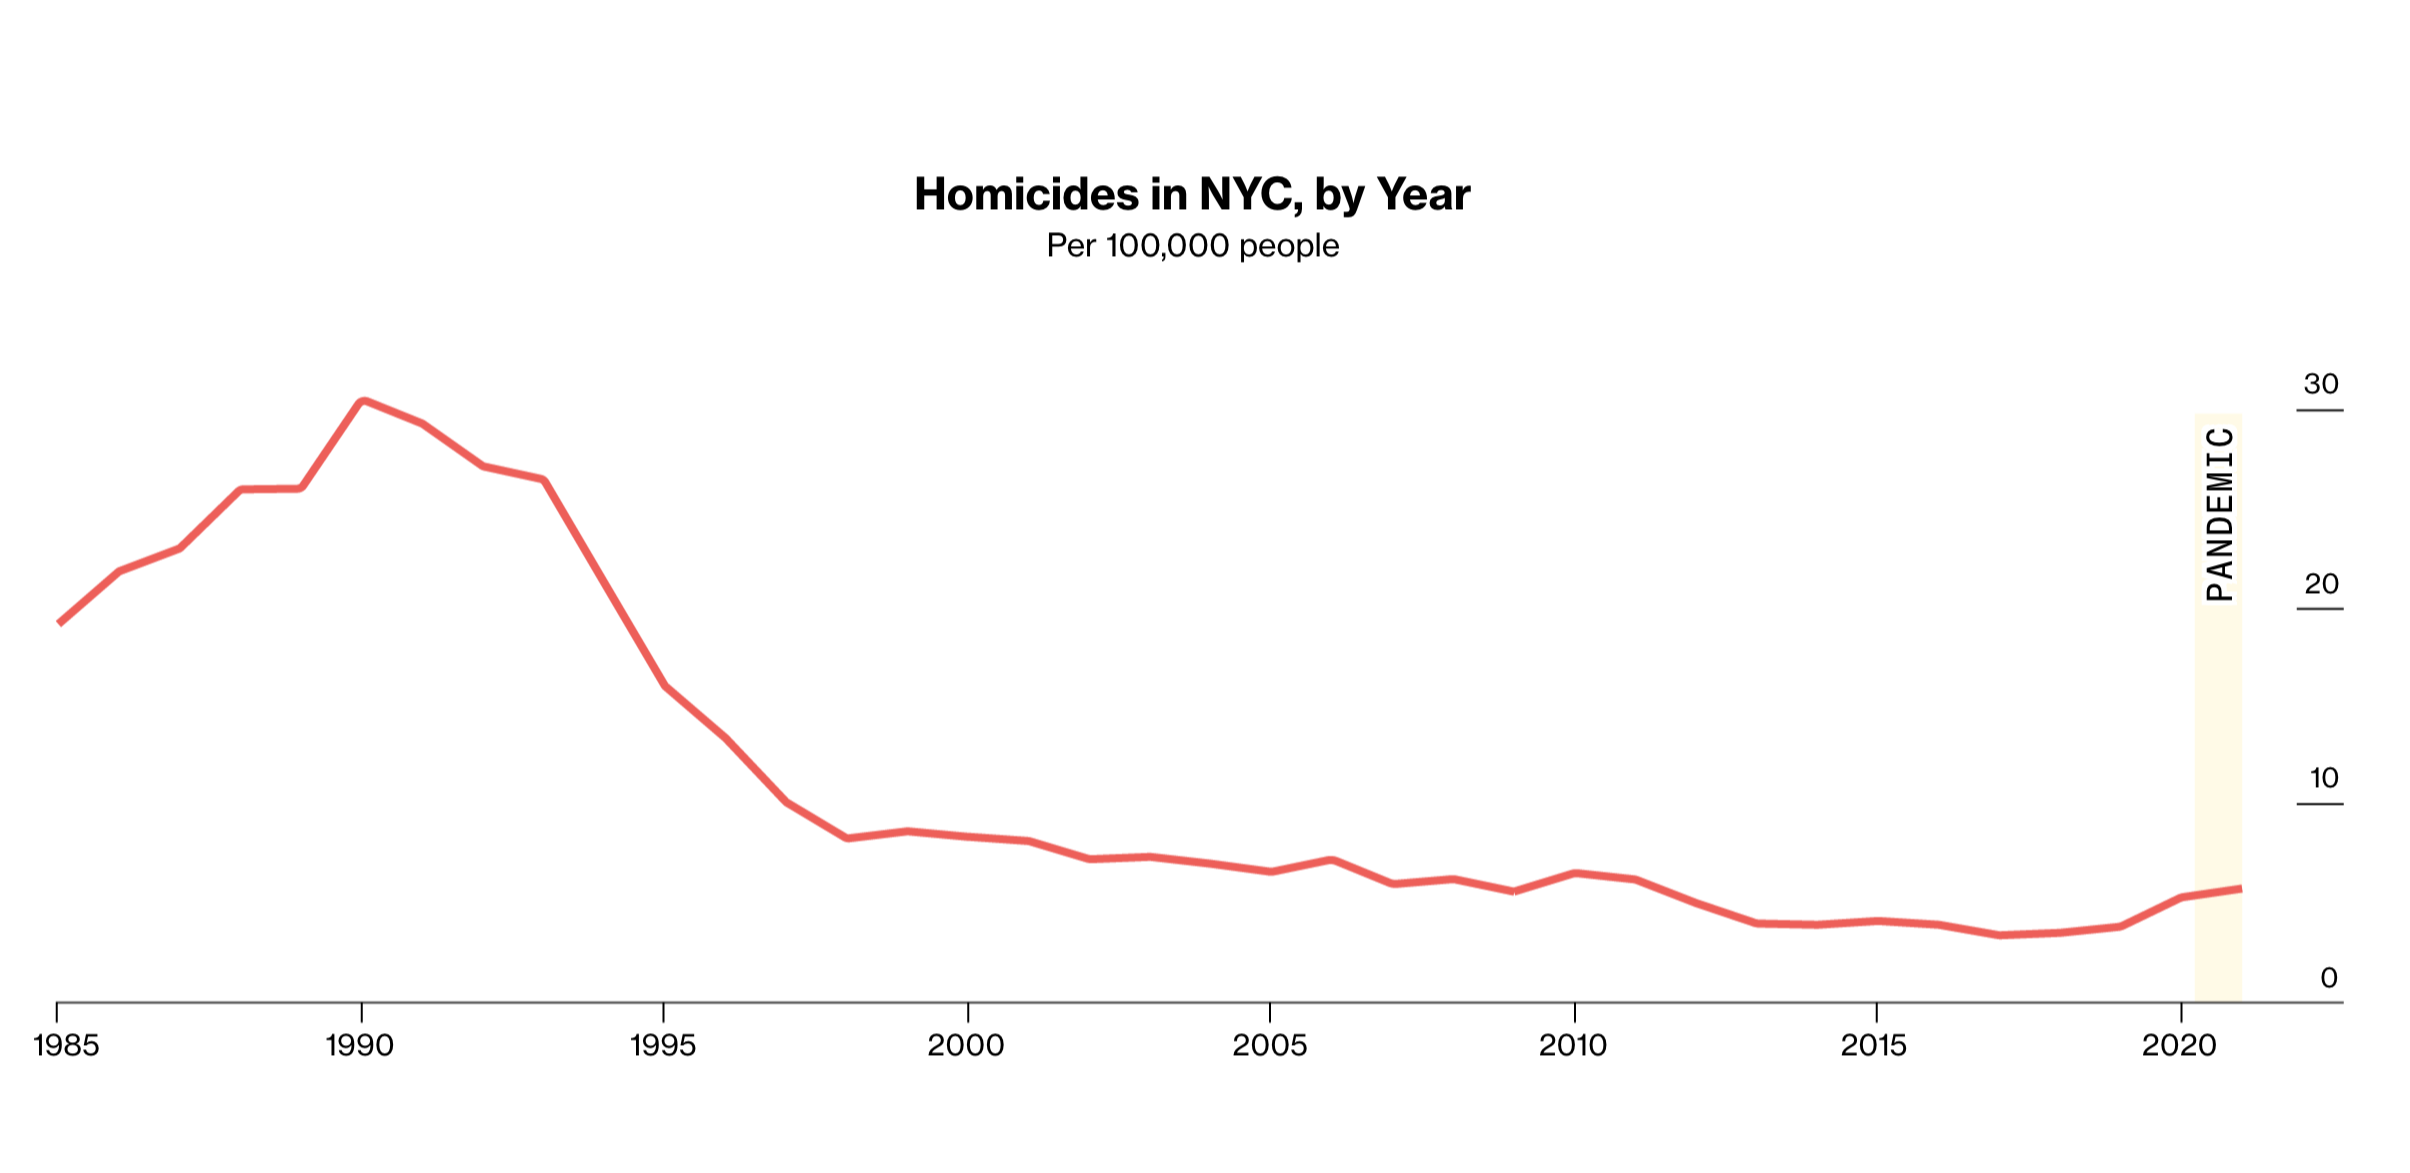
To boost your confidence a bit right now, here is a graph from Bloomberg News showing annual murder rates in NYC from 1985 to 2022:
Still, even if you won’t get killed on the subway these days, you can still get lost. The NYC subway is the largest transit system in the world in terms of number of stations (472), which means that you have to know what you are doing before you use it. Because with over 700 miles of tracks, if you go the wrong way, it might take you a little longer to get to your destination.
Before you do anything else:
You must download a subway map onto your phone before using the system. The map is something you can’t do without if you are new to the NYC subway.
To download a high-resolution PDF, go to: http://web.mta.info/nyct/maps/subwaymap.pdf
Google Maps is a great resource, they give directions using public transportation, even incorporating service changes and delays. However, even if you download a map of New York to use offline, you cannot access transit directions offline. This may be an issue If you don’t have cellular service in New York or once you’re on a subway in a tunnel you may not have service.
Google Maps is a great resource, they give directions using public transportation, even incorporating service changes and delays. However, even if you download a map of New York to use offline, you cannot access transit directions offline. This may be an issue If you don’t have cellular service in New York or once you’re on a subway in a tunnel you may not have service.
In addition, mta.info is a very useful website to bookmark, because it provides real-time service status updates for each subway line right on the homepage. This is especially useful nights and weekends, when the MTA does most of the repair and maintenance work. You can also sign up for email or text alerts for service changes and the latest status updates by subway line on the same site (may not be very useful if you don’t know which lines you will be using the most).
Next:
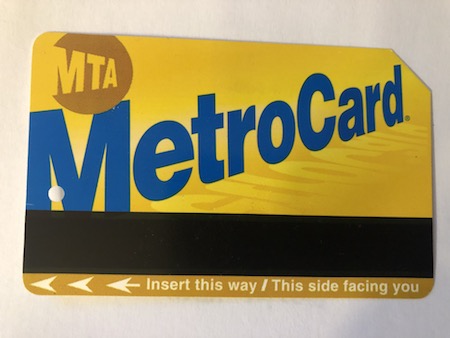
How to enter the system. You need a MetroCard to swipe in, or tap contactless cards or digital wallets using the new OMNY payment system.
Which to use OMNY or MetroCard
To access the subway you can use a MetroCard (which you fill with money or can purchse a weekly pass) or with the new OMNY system which with a tap charges the $2.90 fare to your credit card through a contactless card of a e-wallet.
Read about the MetroCard and OMNY to see which is best for you.
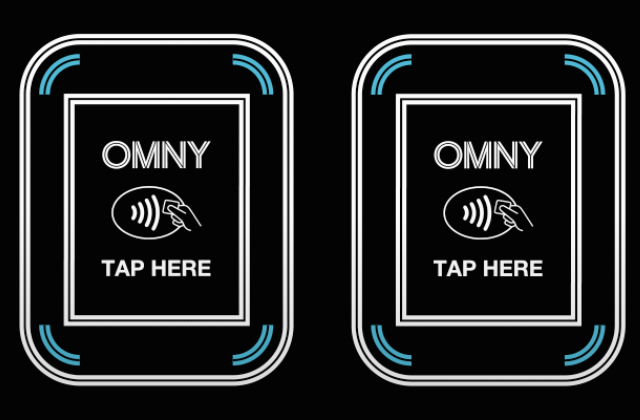
What is OMNY
Using the OMNY payment system may be your best option. Just tap your phone, smart watch or credit card and you’re in! It’s really easy, you can avoid the lines at the MetroCard machines, and you save yourself a dollar by not purchasing a new MetroCard. It’s a perfect option for those taking advantage of our One Day NYC Itinerary.
Once you use the same payment method 12 times in a 7 day period, each tap is free! It is the equivalent of a 7-day metrocard ($34), but without the upfront cost.
Every subway turnstile has a reader that looks like this:
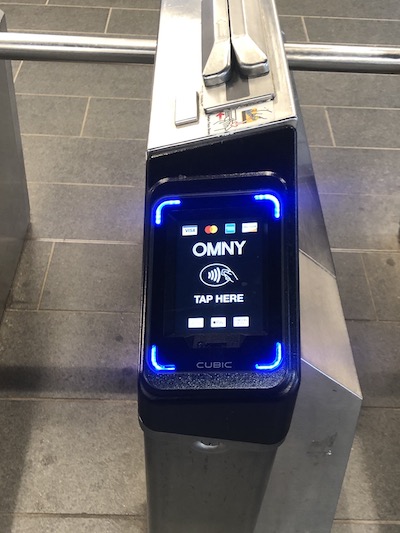
You can pay your fare by touching any credit card or debit card that has this contactless symbol on the front or back:

Or you can use an e-wallet like Apple Pay, Google Pay or Samsung Pay. Make sure as you hold your phone or smart watch near the reader. Ideally, you have data on your phone, but if not, every subway station has free wifi..
It’s easy and even lets you transfer to buses like a MetroCard. If you’re comfortable with technology, why would you ever go through the trouble of buying a MetroCard? A couple of reasons:
- While you can swipe multiple individuals per contactless card or e-wallet, you will only receive one weekly fare cap benefit. You can use multiple payment methods for a family but this might be less feasible.
- You can tap in four individuals per contactless card or e-wallet at each OMNY reader, but for a large group, it may be easier to buy several MetroCards. There are ways to buy MetroCards in bulk, contact us and we’ll explain how.
The next section is how to buy a MetroCard
How to buy a MetroCard
Enter any subway station and look for a vending machine that looks like this:
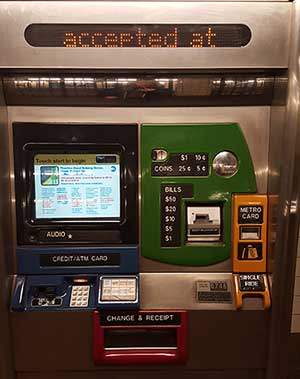
Using the NYC Subway vending machines is, unfortunately, not as intuitive or user-friendly as it should be. But don’t fret, we wrote this guide with you, the visitor, in mind, so we’ll take you through it one step at a time!
All machines take credit cards, but not all of them take cash. Even the ones that do take cash only dispense coins as change, so keep that in mind if you only have a $20 bill and only want a MetroCard with $11 on it – expect to get $9 in dollar coins. e machines will not give more than $9 in change.
If you would rather pay in cash and speak to a human being, each station has a booth with an MTA (Metropolitan Transit Authority) employee in it (usually!). They can answer your questions, sell you a MetroCard for cash, give you a paper map (if they have any on hand – which often they don’t), and even give you change in bills instead of coins.
NYC Subway fare options
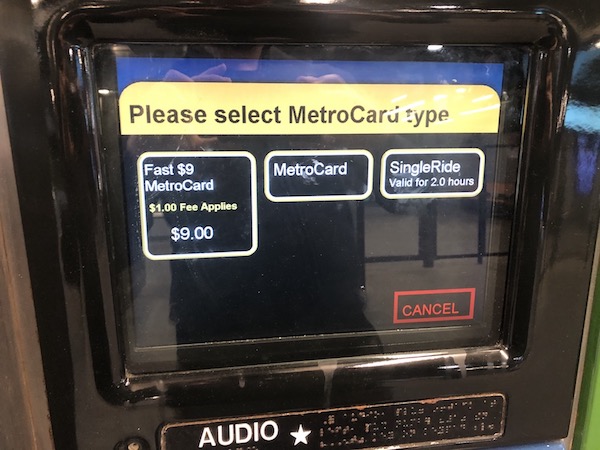
- First, if you only plan to ride the subway once — one way — and you are not going to use the OMNY payment, you can go to any vending machine and purchase a single-ride card for $3.25. After swiping it through the turnstile, you can toss it, since these paper cards are for one-time use only.
- Second, if you plan to use the subway at least a couple of times and you’re not going to use the OMNY payment method, then buy a “Regular” MetroCard (more on this below). The minimum amount to put on a new card is $5.80 (plus $1 for a new card)
- Third, if you plan to use the subway several times a day and are visiting for 4 days or longer, then buy a 7-day “Unlimited” MetroCard. This card allows you to use the subway as many times a day as you please, without incurring any additional charges. The fixed cost of this weekly card is only $34 (plus $1 for a new card).
Each ride with a “Regular” MetroCard is $2.90
So the break-even number or rides, is 12. In other words, if you plan to ride the subway more than 12 times during your visit (which is not very hard to achieve if you do at least 4 trips per day for 3 days), then you’re better off just buying the 1-week “unlimited” for $34 (plus $1 for the card). Again the OMNY payment system means you always receive the best price.
Before you decide on “Regular” vs. “Unlimited”, keep this in mind:
You can swipe a “regular” card up to 4 times at any given time, while an “unlimited” card cannot be used more than once in an 18 minute period.
So if you are traveling as a couple, a group of friends, or a family of 4, and you don’t think you’ll use the subway at least 12 times each, then you’re better off getting one “Regular” MetroCard and passing it to each other (perfectly legal). Otherwise, you would have to get an unlimited card for each member of your travel party. In other words, you can share a “regular” but not an “unlimited” (unless you want to wait 18 minutes between swipes!).
Step-by-step guide for how to buy a MetroCard from a vending machine
Come up to any available vending machine (like the one we showed you above), and touch the “Start” button, then choose your preferred language.
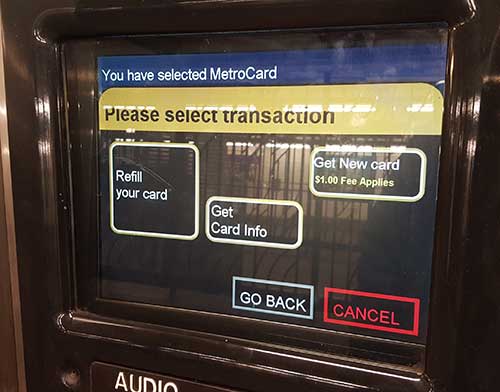
Then select the “MetroCard” button.
If you don’t already have a MetroCard, choose “Get New card”
Now choose Regular or Unlimited (based on what we discussed earlier).
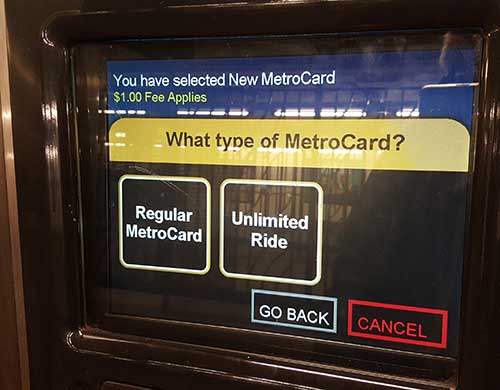
If you choose “Regular” you will see the following screen:
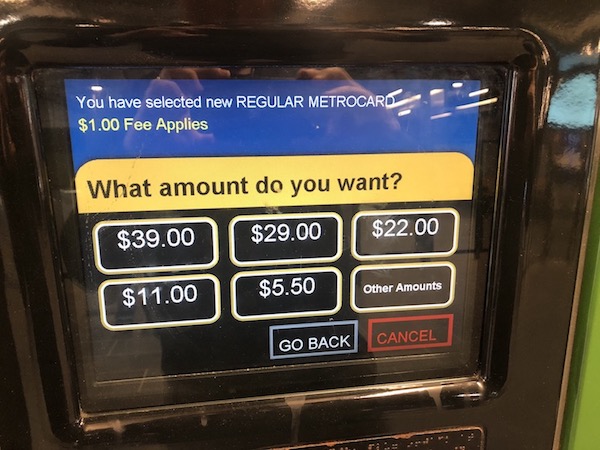
Before you choose an amount, use this simple calculation as a guide:
Given that the cost per ride is $2.90, a round trip per person will cost $5.80. If you are traveling as a couple, you’d need $11.60 combined to make a round trip. If you’re a family of 4, you’d need $23.20.
It’s very unlikely that you will know ahead of time exactly how many time you will ride the subway, so pick an amount that you think you’ll definitely use up, and if you run out of money sooner than expected, just refill your card any vending machine (for this, you’d choose “Refill card” instead of “Get New Card”).
Once you’ve picked an amount, you will be prompted to choose a payment method. Remember, not all machines accept cash, so have a credit card handy.
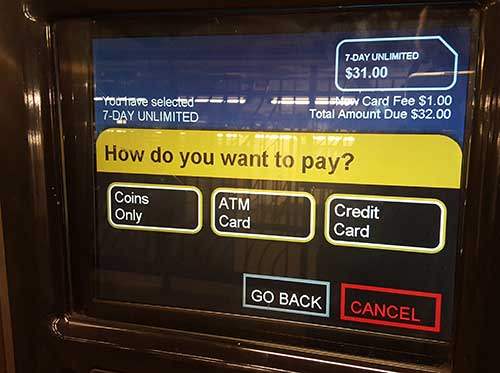
Note: The image above reflects the old price of $31. Now, the 7-day unlimited is $32 (+$1 for a new card)
Assuming you choose Credit Card, you will be prompted to dip your card. Look for the card slot on the bottom left-hand side of the machine.
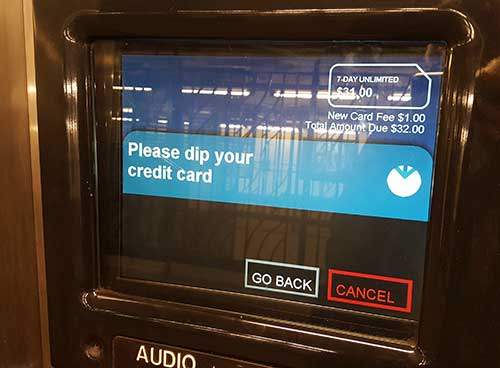
Insert your card all the way into the slot, then pull it out. If the machine has read the card, you will be asked to enter your billing zip code.
Important note for international visitors
If your credit card was not issued in the United States, you do not have to enter your zip code. Simply press the # key to proceed. Only American card users have to enter their billing zip code, followed by the # key.
That’s it! You are now the proud owner of a brand-new MetroCard.
Are you finding this subway guide helpful? Want to get it as a printer-friendly PDF in your inbox right now? Click on the link below to get on our email list, and we’ll send you this entire article in a flash. All you’ll have to do is hit “PRINT”!
How to use the NYC subway
OK, so you’re a master of the OMNY system or just bought a shiny new MetroCard. Now what?
With OMNY just tap and go. Make sure you’re activating your e-wallet. You may need to press your thumb or type in a security key on your phone.
For the MetroCard, you have to swipe your way in, which sounds simple but can sometimes be tricky. The card readers installed in the turnstiles are finicky. You have to treat them just the right way for them to let you in. If you swipe too fast, try again. If you swipe to slow, try again. If you bend the card as you swipe, you’re wasting your time (and the time of the now-angry people behind you).
So here is all you need to know to be able to swipe in like a local:
How to use the Metrocard like a pro
Hold the MetroCard with the word “MetroCard” facing you, with the black stripe down. Come up to a turnstile with the MetroCard in your right hand (the card reader is always to the right of the turnstile). Then swipe in a forward motion, while keeping the card flat against the strip and straight (don’t lift it as you swipe, it’s not an airplane). Swipe it at a normal speed – not too slow, not too fast. And if you don’t get it right the first time, don’t panic, just try again.
Note of caution:
There are two types of turnstiles. There are the regular turnstiles found in most stations, where the bar is horizontal and at hip level (like the one below).
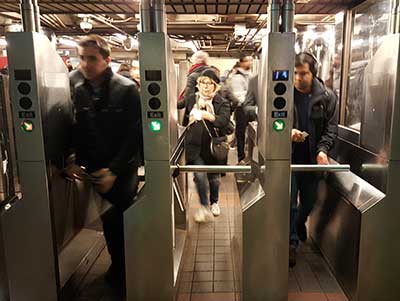
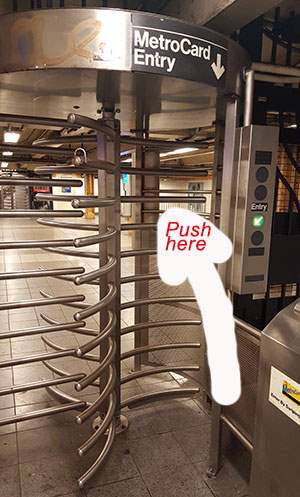
There are also vertical turnstiles that are as tall as a professional basketball player. When you use these vertical ones (like the one below), please make sure you push the bars that are the closest to where you swipe. In other words, don’t reach for the next set of bars, which would be to your slight left; otherwise, you will have wasted a swipe.
OK, assuming you’ve made it successfully through the turnstiles, you are ready to ride.
Now what?
Figuring out “Uptown” versus “Downtown”
Well, you’ve made the rookie mistake of swiping the card before checking if you’re entering on the correct side of the platform. When entering larger stations, you can swipe first then pick a direction (downtown vs. uptown). But with smaller stations (and there are many more of these in the system), if you swipe on the downtown side of the platform but want to go uptown, you will not be able to switch sides. In such a scenario, you would either have to take the subway in the wrong direction until the next “big” station where you can cross over, or you would have to exit, cross the street to the other side and swipe again.
So let’s take a step back and talk a bit more about this whole “Downtown” vs. “Uptown” concept:
Manhattan is a skinny island that’s only about 2 miles wide and 13 miles long. The shape of this crowded island naturally led to a mostly linear subway system (in Manhattan). That means that most of the subway lines in Manhattan generally run in a north-south fashion. In NY parlance, north is “uptown”, south is “downtown”. Piece of cake. Even a pigeon can remember that.
In many other cities “Downtown” implies a commercial core or hub, which could be up, down, left, or right. In New York City, however, “Downtown” literally implies down town. So if you look at a map of Manhattan, Downtown would be towards the bottom.
Given this fact, most subway stations in Manhattan will have a “Downtown” side (trains heading south) and an “Uptown” side (trains heading north). The side you need depends on two factors: Where you are and where you want to go.
To oversimplify things a bit:
If you are generally heading south, take the “Downtown” side. If you’re generally heading north, take the “Uptown” side.
Again, we are only talking about Manhattan here.
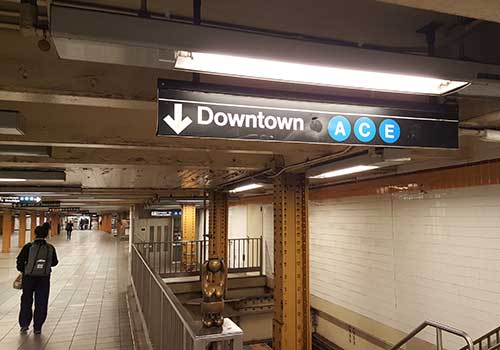
Look for signs above the stairs to figure out what side of the platform you need to go down to.
Here is what a “Downtown” sign would look like:
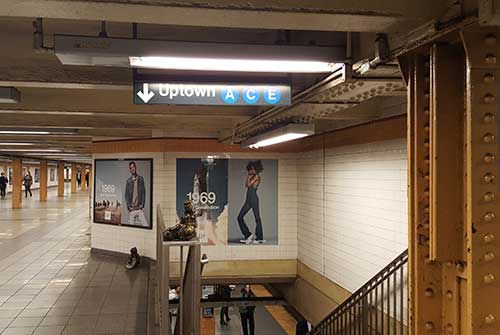
And on the opposite side would be the stairs to the “Uptown” platform:
But we are still not done!
To complicate things even more, there are Local trains and Express trains!
Figuring out “Local” versus “Express” subway lines
Before we tell you which one to use, here is how you can figure out if you even have the choice:
Many subway stations just have one track for each direction (one track for Uptown, one for Downtown). You can call these stations “Local”, in the sense that only trains making every stop will stop at that station.
So if you get down to the platform and you only have a wall on one side and one track on the other, you don’t have to worry about Local v. Express, because Local is your only option at that station (though you might see the Express train speeding by on the second track away from the platform).
On the other hand, if you enter a bigger station and get down to the platform level, you might see two tracks – one on your left and one on your right. That means you now have a choice between an Express train and a Local train.
“But how will I know which one is which?”
Don’t worry, each train platform is marked clearly with black banners hanging above your head. Unfortunately, there aren’t that many banners per station, so if you don’t see one in front of you immediately, just walk in either direction for a bit until you see one. They are usually positioned close to the stairs.
Here is what an “Express” sign might look like:
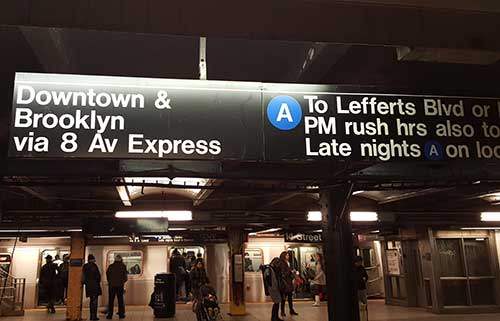
This sign tells you two important things:
- The A train on this track is heading into Downtown Manhattan along 8th Avenue, then going into Brooklyn.
- It is also running on the Express track.
Here is an example of a “Local” sign:
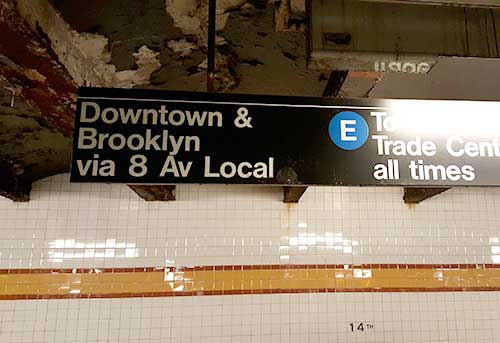
Here, you can see that this train is also going Downtown via 8th Avenue, but that it is running on the Local track.
So which one should you use?
If you want to play it really safe then stick to the Local to avoid getting on the Express and skipping your stop. Express trains often skip several stations at a time. For example, the D train goes express from 59th street to 125th (no stops in between), so you would not take this train to the Natural History Museum at 81st street (just to give you one example).
Sticking to the local track ensures that your train will make every stop.
However, if you are good with maps and want to shave a few minutes off your ride, you can refer to the subway map where local stations are marked with a black circle and express stops are marked with a white circle (obviously, local trains stop at the express stops as well) to see if the Express train makes sense for you on a case-by-case basis.
Are you enjoying this guide? Would you like to have it with you for reference? Click on the link below to get this as a free and printer-friendly PDF file in your inbox (with bonus maps)!
But that’s not all:
With 22 regular subway lines plus 3 shuttle lines (these just go back and forth between two points), you also need to figure out which line is best to take each time you ride the subway.
That’s why it is very handy to have a city map with you (ask your hotel concierge for a free copy, or just use Google Maps, save it offline!). Find your current location on the map and determine where you are trying to go in relation to your current position. Most city maps (whether printed or online) will show the closest subway stations. Look for the stations near you and check which subway line(s) would get your closest to where you need to go.
How to use Google Maps for subway directions
Leverage your smartphone while visiting NYC for step-by-step navigation. Google Maps provides just that, including detailed subway directions.
Example #1: You want to go from your hotel, the Casablanca in Times Square, to the 9/11 Memorial
Open Google Maps on your phone, tablet or computer.
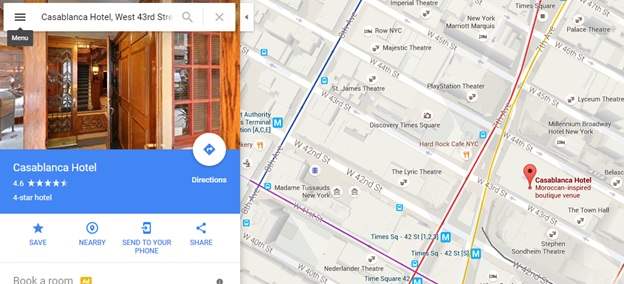
- Type in your hotel name (in our example, the Casablanca). You will now see the closest subway stations indicated with the “M” icon. Zoom in to see which subway lines stop at that particular station. For example, “Times Sq – 42nd St [1, 2, 3] tells you that the 1, 2, and 3 lines stop there.
- Now click on the Directions icon (look for the right arrow in a white circle). Choose the train icon, which represents “Transit”, then click on the opposite arrows icon to reverse direction. Then type in “9/11 Memorial” as your destination. Your screen should look something like this:
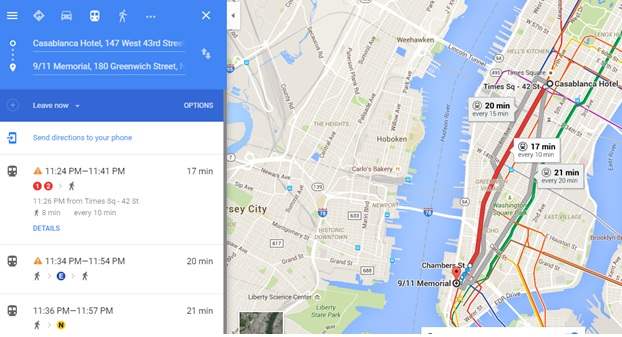
5. By default, Google gives you the “best route” on top, which is determined by total commute time, number of transfers, and walking distance. To view this route, click “Details” under the top choice. Here is what you will see:
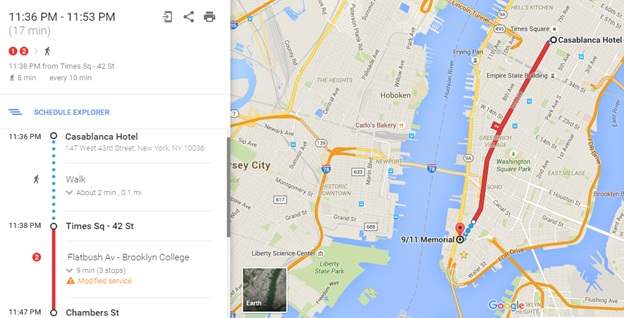
As you can see from the map, the 9/11 Memorial is almost all the way at the bottom of Manhattan island, so to get there from the Casablanca Hotel, you would need to take the subway Downtown (not Uptown). To be exact, the subway signage you need to look for will say “Downtown & Brooklyn” which just means that the train is heading south (Downtown) in Manhattan, then going into Brooklyn.
According to Google Maps, your total commute would be around 17 minutes and would combine using the subway and walking.
Quick note:
The step with the red line that reads: “Flatbush Av – Brooklyn College” does not mean you have to take the 2 line to Brooklyn College. The stop you have to get off at is “Chambers St”. “Flatbush Av – Brooklyn College” is simply the last stop in the direction you need to take the 2 line. The conductor (or recorded announcement) will say something like “Passengers, this is a ‘Flatbush Av – Brooklyn College’ bound 2 train. The next stop is Chambers St.” That’s what you want to hear.
Example #2: You want to go from the 9/11 Memorial to the Empire State Building
Again, pull up Google Maps, use “9/11 Memorial” as your starting point, “Empire State Building” as your destination, and make sure you have the “Transit” option chosen.

Walking to the R train seems to be the best route, even though it’s 3 minutes slower overall than the next best route. That’s because there is less walking with this route. Of course, if you don’t mind walking a bit more, you can choose the second option.
But for the purposes of this example, we’ll choose the first option. The route details look like this:
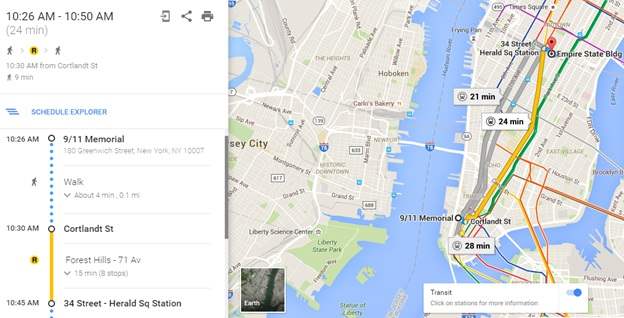
Notice that this time we are traveling north or Uptown. The “Forest Hills – 71 Ave” label is once again the final destination of the R train, not the stop you need to get off at. The stop you need is “34 Street – Herald Sq Station”.
When you get to the R station at Cortlandt Street, look for signs that say “Uptown & Queens”. Why? Because as we’ve established, you need to head Uptown, and the “& Queens” part just means that after going uptown, the R train will continue into Queens. The alternative direction on the R train would be “Downtown & Brooklyn”, which is in the opposite direction of the Empire State Building.
By the way, Google Maps allows you to email or text your chosen route to yourself. You can also print it if you have access to a printer.
OK, last thing before we get to Subway Tips:
The NYC subway system is pretty old. Many stations in Manhattan are a century old or older (the first line opened in 1904, as we mentioned earlier). And with nearly 6 million passengers a day and a system that never stops running, there is a lot of wear-and-tear. Tracks need to be replaced, switches fixed, rats poisoned (no joke!), etc.
The Metropolitan Transit Authority (MTA) mainly cares about getting people to work and back home Monday through Friday.
That means that the best times for them to do maintenance and repair work is weeknights and weekends. Unfortunately, that’s also the time many tourists will rely on the subway to get around. The good news is you can be prepared before you ride.
First, if you know where you’ll be headed Saturday morning and it’s Friday night, go to Google Maps and plug in your destination, but instead of “Leaving now” choose “Depart at” and pick a later date (say Saturday at 10am). Google incorporates planned service changes into their route recommendations.
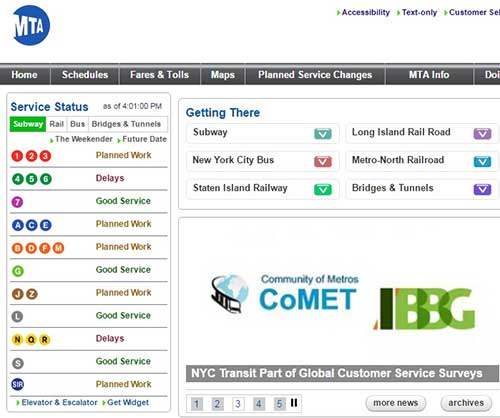
Second, you can also check the latest status of subway service (by line) on the homepage of mta.info:
But if you didn’t do any of that before you got to the platform, look for postings that look like this:
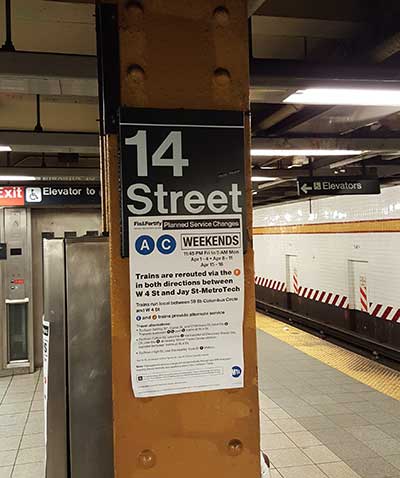
These service change announcements will tell you what’s happening and what your route alternatives are.
Look, we know all this may sound very intimidating, but you should get the hang of it pretty quickly once you start using it. And if all else fails, ask someone who looks like a local (and isn’t talking to himself). Most New Yorkers will be happy to give you directions.
OK, if you got this far, you should now have the confidence to use the NYC subway without getting lost (at least, not completely). So in the last section of this post, we wanted to share with you a few tips that will make your subway experience more pleasant.
NYC Subway Helpful Tips For First-time Visitors
Use these tips to avoid pissing off locals when using the subway
- “Please Swipe Again”
If you are new to the MetroCard and haven’t figured out the right swiping speed yet, please be courteous during rush hour and let others pass if you can’t get it to work. Don’t become a bottleneck, or risk the wrath of angry commuters grumbling and breathing down your neck. But if you see the evil “Please swipe again at this turnstile” message, take a deep breath, relax, focus, and swipe at a moderate speed (not too fast, not too slow). But do not surrender your spot or you may lose your fare. - Don’t risk it
Step away from the edge of the platform. Platforms are often crowded and there are a lot of New Yorkers in a rush to get somewhere. The last thing you want is to have to climb out of the tracks with an oncoming train blinding you with its lights. “Don’t become a statistic,” as they say. Or a deer in headlights. - There is a reason that subway car looks empty!
If you see a mostly empty subway car during rush hour, or one with all the people crowded to one side, there is probably a good reason for it. So unless you have no sense of smell, then hustle over to the next car before the doors close. Homelessness, poverty, and mental illness are a tragic reality for some New Yorkers, who sometimes find shelter and respite on the subways, especially in the colder months. - Don’t block the doors
If there are no available seats and the train car is full, it’s OK to stand next to the doors, but please step off at each stop to let people off. Don’t become those annoying riders who block the doors feigning ignorance while staring at their phone screens. - Enjoy the live music? Drop them a dollar.
There are lots of talented musicians who supplement their incomes by performing on the subway – a cappella, guitar, drums, sax, a mariachi band, the occasional cello — you name it. So if you like what you hear, feel free to tip. They are not making up a sob story or using their kids as bait; they are simply there to entertain us as we ride. And sometimes, a great song is exactly what we need for a little morning “pick-me-up”. - Whatever you do, don’t stare!
Don’t stare at anyone. New York is full of interesting characters, and the subway is often the best place to spot them (because, by definition, we are all stuck in place for a while). Glancing is OK, staring is not. You never know who you might offend or set off. Plus, in New York when we see a celebrity or someone unconventional, we play it cool! - New Yorkers hate subway small-talk
It is also not encouraged to just start talking to strangers on the subway, unless you are asking for directions. We are a city of 8.8 million residents, and we make it work because we follow certain unwritten rules. We are willing to wait in lunch and coffee lines. We patiently fan ourselves waiting for trains on stifling platforms in the summer heat. We stand shoulder-to-shoulder, or sit hip-to-hip on rush-hour trains without uttering a word or even acknowledging each other’s existence. Sometimes, we accidentally touch each other, like when a subway pole is full of hands and you place yours on someone else’s by accident. The most you will hear is “sorry”, but more often than not, just a quick change in hand placement will placate the other party, preferably without eye contact. We occasionally bump shoulders on crowded sidewalks full of rushed commuters and don’t even bother to turn around. But the one thing many New Yorkers won’t tolerate is to be engaged in random small-talk on the subway. Perhaps we haven’t had our morning coffee yet, or maybe it’s 7pm and we’ve had a long day at the office, hate our boss, our job, the crowded train, or life itself, and the last thing we need is to be engaged in conversation. - Be smart with your valuables!
Our last piece of NYC subway advice is the most obvious:
Make sure you secure your valuables, which means no wallets or smartphones in back pockets. While you won’t get mugged or stabbed on the subway these days, it doesn’t mean your pockets or purses can’t be picked when you are not paying attention.
Now with all that out of the way, go out there and ride with confidence!
If you wish to get a local’s view of the city along with an in-person intro to the subway, then contact us for a custom private tour, and we’ll show you the best of New York and teach how to use the subway on your personalized sightseeing tour.